
We are thrilled to welcome you here! Our blog will assist you in becoming familiar with Kenyt CRM effortlessly. In this post, we will cover the fundamentals so that you can get started promptly.
Let’s begin by comprehending the definition of Lead, Deal, and Customer in Kenyt CRM.
LEADS refer to potential customers whom you wish to follow up with and assess their interest in your products and services. Typically, your pre-sales team will engage with them.
DEALS are created when a lead shows potential for a sale. Sales personnel usually focus on the Deals section.
CUSTOMERS are entities that have already made a purchase. The customer onboarding and support team will usually handle them.
In addition, you can access Contacts and Companies under Accounts.
When you create a deal, a business contact or company is created with that deal. A company object can have multiple contacts attached, including stakeholders and decision-makers that you need to work with to close a deal. These can be stored as Contacts. These contacts are also useful for future reference.
Step 1: Import leads / deals/ contacts / customers in Kenyt CRM

Our recommendation is to “Export Sample Excel” file and copy your data in this required format. Alternatively, you may use your existing CSV file to import. If there are any unmapped fields during the import process, an error file will be sent to your email, and you can re-import after fixing those mappings.
Add an entry manually: For any new lead/deal/customer/company, there is an +Add option given next to Actions.

Step 2: View Lead / Deal / Customer / Contact / Companies
Once the leads and other objects are imported in CRM, next step is to define the view as per your preference. There are 3 views available to you.
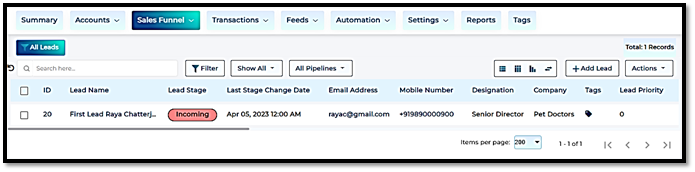
- TABLE VIEW allows you to view your leads with the option to sort and choose the column based on your need.

- You can easily swich between Table/Board/Chart views.
- You can reorder and choose table columns using the highlighted option.
- As you hover on the column name, sorting will be highlighted.
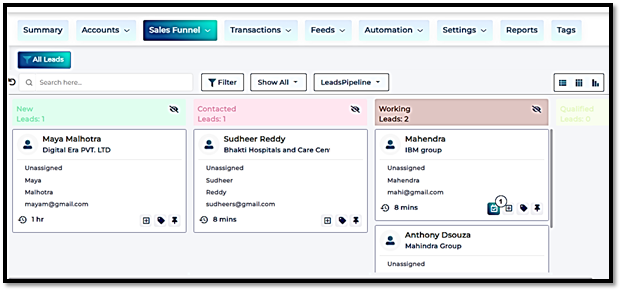
2. BOARD VIEW allows you to view your leads in the form of cards. You can Pin the card and there are options available to you to easily create a tag, activity and tasks associated with the lead. You can easily drag and drop a lead from one stage to another in board view
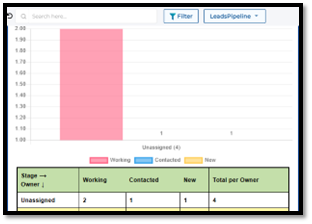
3. CHART VIEW let you create a quick pivot chart for your data.
Step 3: Create Filters and Save views
Now that you have all your leads, deals, customers and other objects in the CRM, you may want to focus on the leads based on some attributes. For this you can use filter to find these leads quickly.
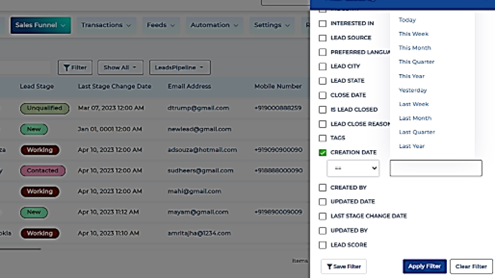
Using the “Save Filter” option will allow you to save the applied filter and create a new view. To save a filter, simply select the “Save Filter” option. As an illustration, we have created a view called “Leads Created this week“, which displays leads created within the current week.
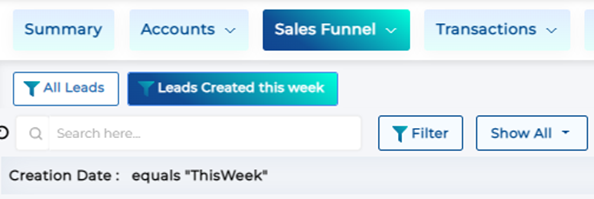
Note: You can create and save multiple Views in filters.
This blog aims to aid new users of Kenyt CRM in getting started by offering fundamental information. Our focus in this post is entirely on the basics. Kenyt CRM offers an array of advanced features, such as Reports, Workflow automation, Pipeline stages, Properties customization, and role access, which can help any enterprise manage their entire sales funnel efficiently. Detailed coverage of these topics is available in separate blog posts. For the sake of simplicity, we have not included them in this post.
For any queries, you can write to us at support@kenyt.com with the title of this blog post.


