
Introduction
With all the digitization in place, 2023 has evolved WhatsApp as a powerful tool for reaching a large audience instantly. Its vast user base and widespread popularity allow businesses to leverage WhatsApp blast message for effective marketing campaigns, which can significantly change how your business interacts with your target audience.
To simplify the process, Kenyt, an emerging leader in marketing automation, presents an intuitive and user-friendly broadcasting solution with the help of WhatsApp Blast.
In this comprehensive guide, we will explore & explain how to maximize the potential of WhatsApp Blast Message Campaigns using Kenyt’s platform with a step-by-step guide to navigate the process and help you set up your first WhatsApp Broadcast campaign with Gupshup WhatsApp API provider.
Get ready to discover the key strategies, best practices, insights and hacks to utilize the true power of WhatsApp marketing and skyrocket your business success.
Step-1 Setting up your Kenyt Account
Go to the Kenyt website using your preferred web browser.
Click on the “Sign Up” button on the Kenyt website’s homepage if you are a new user or “Sign In” using your Kenyt Credentials if you have already created an account for Kenyt Dashboard.
Fill out the registration form with your name, email address, and password. Make sure to use a strong password for account security.
Check your email inbox for a verification email from Kenyt. Click on the verification link provided in the email to verify your email address and enter your organization/business name and email. Check your spam or junk folder if you don’t see the email.
After completing your profile, you’ll be redirected to the Kenyt Dashboard.

Step-2 Navigating Through The Dashboard
You will find a hovering toggle switch on the left side of the screen. This is where you can switch between different Kenyt tools.

Step-3 Getting Started with Your First Campaign
In the toggle menu, there will be a drop-down list of different tools; select “Campaigns.”

Step-4 Setting Up Your Template
After you land on the message template page, you will find an “Add” button adjacent to “upload file.” Click on it to get started with setting up your message template.

Can’t get enough leads from your campaigns?
Try WhatsApp Blast by Kenyt
Engage with your customers where they are.
Step-5 Creating Your Message Template
You will see 5 blocks on this page, Template Name, Template Type, Group Name, Language, and Subject. Here is a quick overview of each of them.
Template Name: You can name your template as per your wish. It can be named after the campaign, product, or even region. Customize it as per your requirement.
Template Type: It will be a drop-down menu to select the use of the message template. There will be four options in the drop-down menu: Email, SMS, WhatsApp, and User Notification. Select WhatsApp from this list as you wish to use this template for WhatsApp Blast.
Group Name: The group name represents where you wish to save this message template. We have put this under the “Kenyt Campaigns” folder; you can alter this as per your requirement. For instance, Say if you are an automobile agency owner and want to create a message template for the marketing purpose of a motorcycle that falls in the “Commuter Motorcycles.” You can save this template as “Commuter Campaigns.” it will also help you segment your message templates and save time while reusing them.
Language: The language tab represents the language you want to broadcast. WhatsApp offers language personalization, especially for the Indian audience considering the diversity of languages in the country. The more personalized interaction experience you create, the more leads you get. It is as simple as that.
Subject: For WhatsApp Blast Messages, you do not require a subject.
Important: Fill in all these four sections carefully and as per your target audience demographics. We strongly advise you to recheck them to avoid any discrepancies.

After filling in all the details and scrutinizing, click the “Save Template” button below the top right corner. This will save your message template in the specified folder.

Step-6 Adding the Message Body
On this page, you will find 11 boxes; out of these, you can make edits in 8 boxes. Here is an overview of these to help you get your message ready for the broadcast.
Static Property Boxes
You cannot change the values of these boxes; if you think you have missed something, take a step back and make the changes.
- Template Name
- Status
- Approval Status
Dynamic Property Boxes
- Template Type
- Language
- Template Content Type
- Message Body
- Message Header
- Message Footer
- Button Type
- Group Name

Step- 7 Save Your Template
Go to the top right corner and hit “Save.”


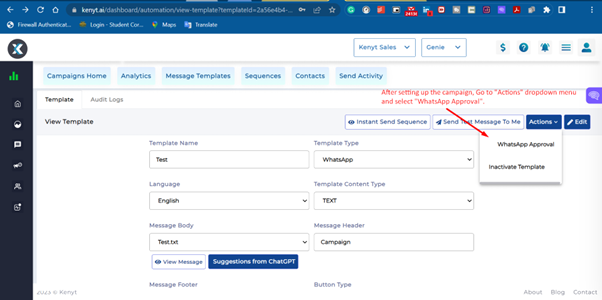
Step- 8 API Provider Approval Process
Once you save the template, go to “Actions” and from the drop down menu, click on “WhatsApp Approval.”
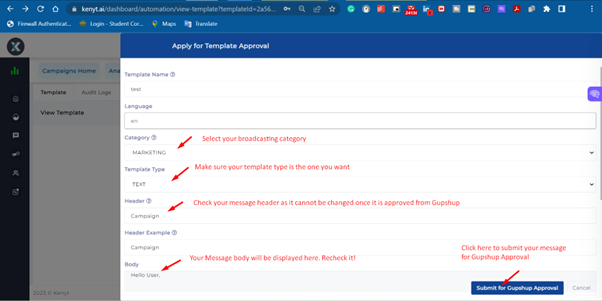
Step- 9 Review Your Template and Message Body Before Approval
Before applying for approval, we advise you to check your message body and template properties thoroughly. You cannot change either once you hit the “Submit for Gupshup Approval” Button.
Congratulations, You have successfully created a Messaging template on Kenyt.